Image ratio and Crop tool
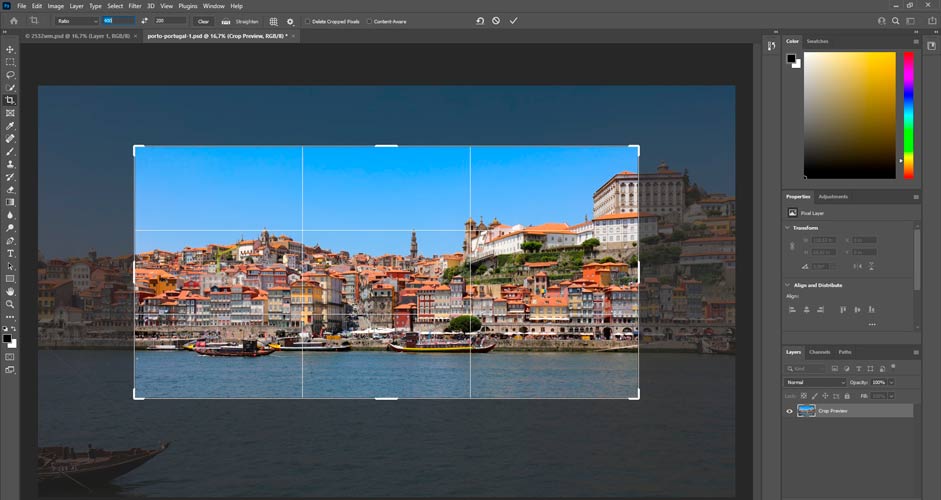
With the Crop tool (on the left-hand side, 5th from the top), it's possible to change the image ratio and to get rid of the unnecessary parts on the edges. In the image below, the ratio is chosen to be 400*200. By dragging the edges of the selection box you can choose which part of the image will be included in the final version.
When you click the check mark, everything outside the selection box (the darker area) will be excluded. It's also possible to move the whole selection from left to right, etc. If you don't check the "Delete Cropped Pixels", the excluded area will stay in the background, and it will always be available if needed. The whole image is also visible in the Camera Raw Filter, if you don't delete the cropped pixels. Whether it's a good or a bad thing, it's up to you.
After the cropping is finished, it's advisable to choose the magnifying glass in the lower left corner and click "Fit Screen", so you will be able to edit the image in full size.

Straightening the image
With the same Crop tool, it's also possible to straighten a tilted picture by clicking Straighten in the top bar. By clicking on the picture, pressing the left mouse button and moving the mouse, the angle and direction can be determined.
In the picture below, the task is easy, since the sea level should be straight. By tilting the picture 1.7 degrees to the right, the problem will be solved.
If you try straightening the image back and forth to see what looks good, you will have to select Straighten again every time. The final version will be executed by pressing the check box button in the top bar. The undo button is located next to it.

Lens correction
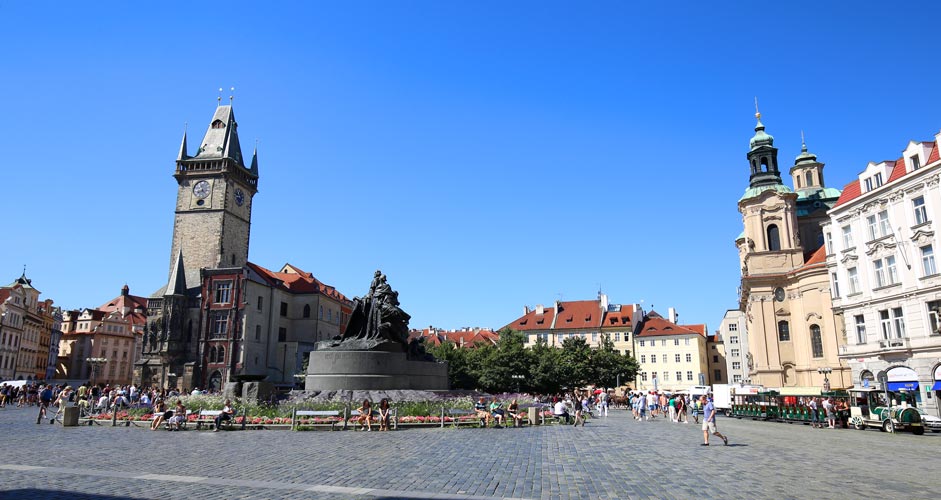
Especially with wide angle lenses (under 50 mm), the buildings or trees can fall in either direction. If you stand at the foot of the buildings and aim upwards, the buildings will fall inwards. And if you take a broad view of a natural landscape from somewhere high aiming downwards, the trees on both sides will fall outwards.
It's always advisable to hold the camera as straight as possible, but that's not always an option. If so, you can fix the problem in Lens Correction (in the "Filter" menu).
There are several options, but the correct one for this purpose is "Vertical Perspective" under the Custom tab.
If there's not enough wastable room on the edges, it can cause a problem, since when the perspective is corrected, some of the areas on the edges are cropped. If you are familiar with the Clone Stamp Tool, it's always an option to clone, for example, some more sky above a tilted building. Then, when the building is straightened, the building has more room above it only the cloned "extra sky" will be sacrificed.
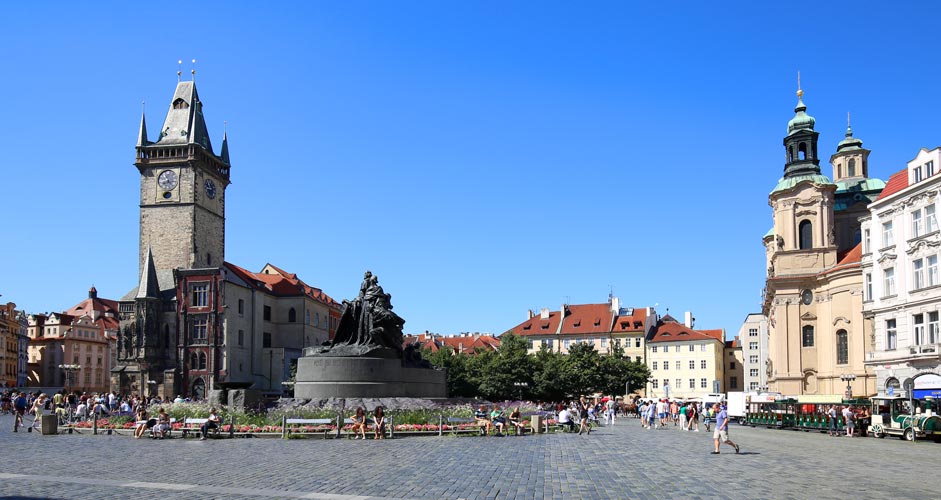
The lower image below is straightened without any cropping. You can see how some of the buildings have been cropped anyway because of the lens correction.
The lower picture:
- Lens correction -28
Deepen the colors with Dehaze
Of all the editing possibilities available in the Camera Raw Filter, Dehaze is the one that makes almost every photo better. It's a combination of increased contrast, sharpening and deeper colors. As the name implies, it removes haze from the image.
If you know you’re going to shoot in foggy conditions, you should use a Circular Polarizing Filter on the lens (if you have one), because Photoshop can't perform miracles. Nonetheless, it enhances slightly hazy photos very well.
In the picture below, just some overexposure and haziness have been enhanced with Dehaze.
The lower picture:
- Dehaze +40
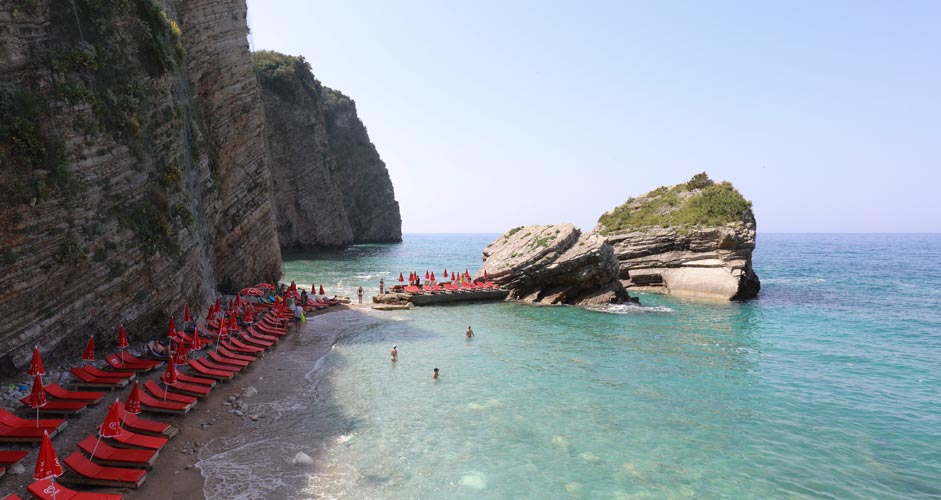
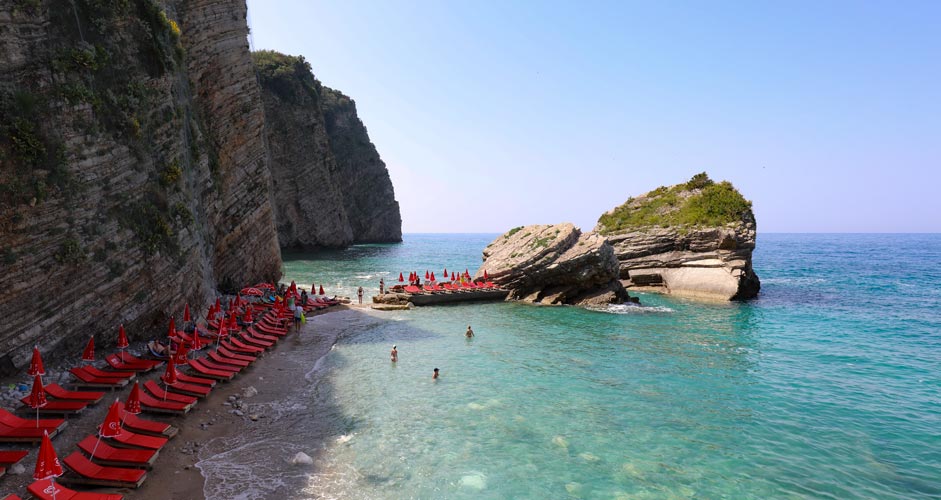
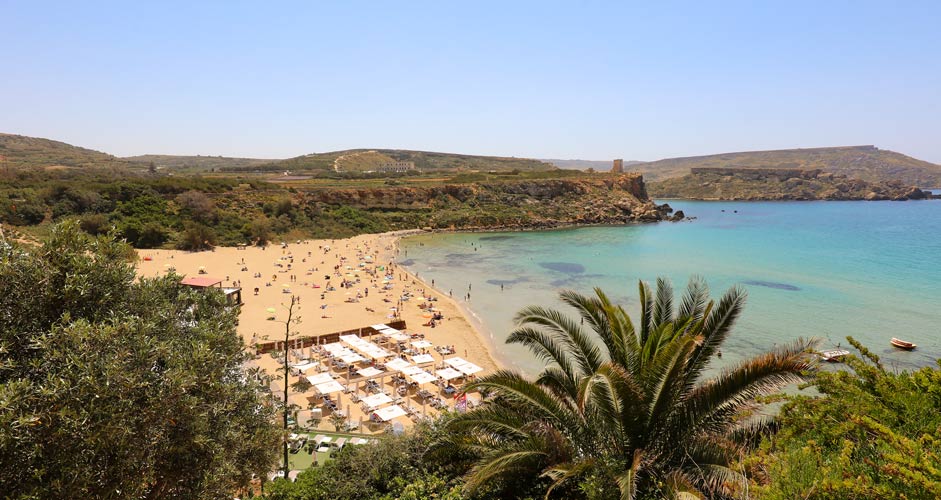
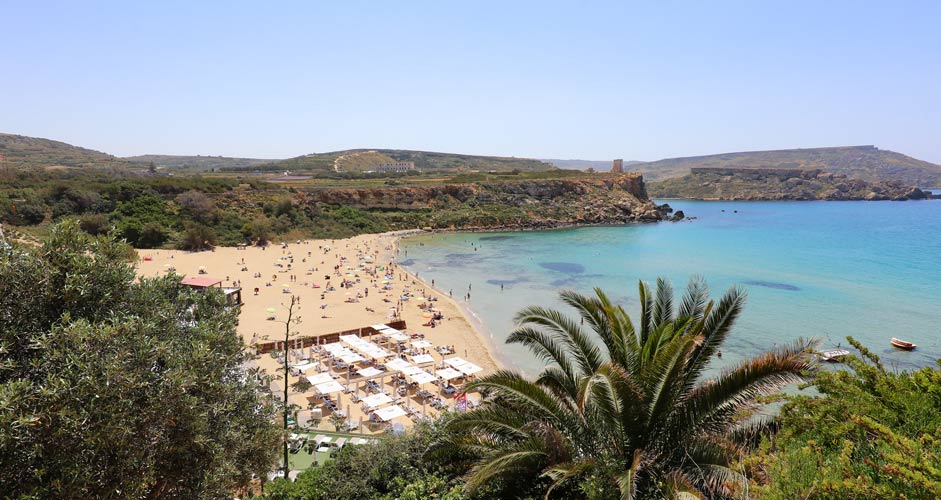
Photo temperature
When the camera is focused on a shade of yellow, like sand, grass or trees, the temperature of the picture can get quite high and the result doesn't look very fresh. In the Camera Raw Filter, Temperature can be found at the top of the tab. With the slider, it's easy to set the temperature colder or warmer.
In the picture below, the focus was on the grass across the bay, so the picture ended up being too warm.
The lower picture:
- Temperature -15
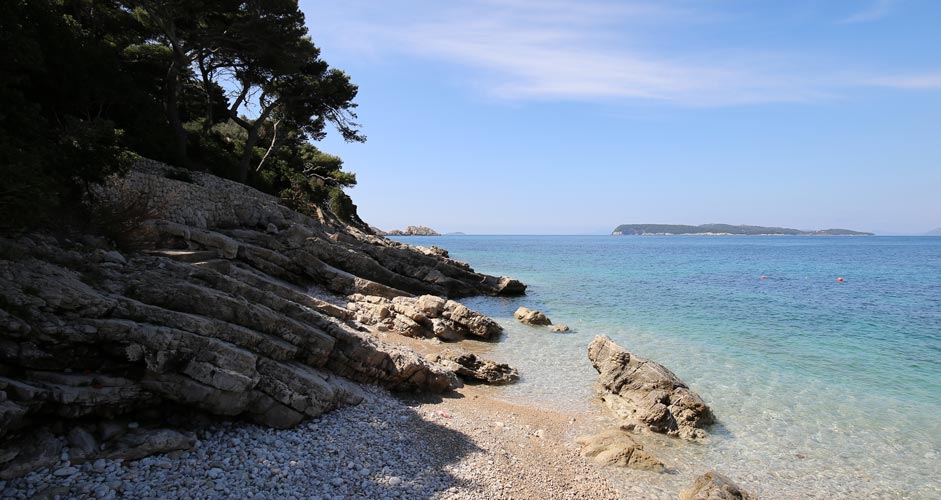
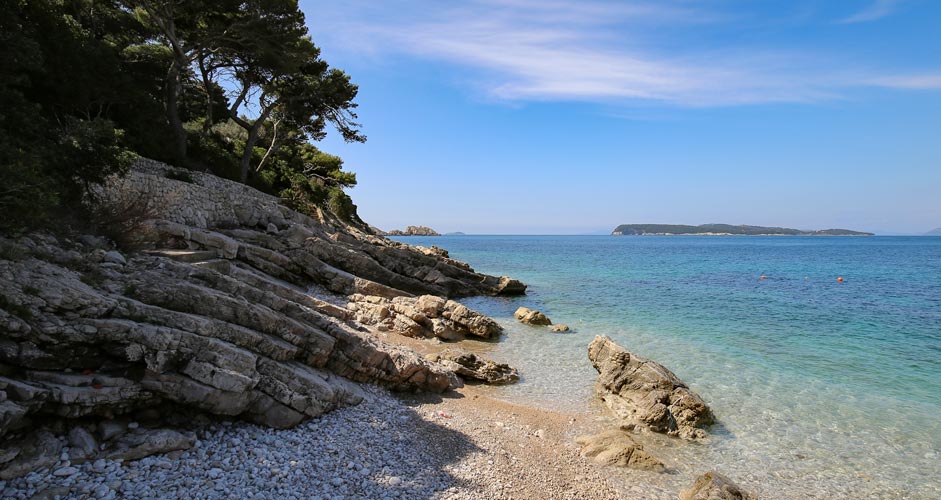
Shadows and highlights
Overexposed or underexposed images are easy to correct with the Camera Raw Filter. Right there at the top is Exposure, which allows you to easily increase or decrease lighting in the image.
However, in the image below, it doesn't work because it has both problems. The camera sometimes exaggerates the contrast between shadows and lights, so it’s a good idea to smooth them out with Highlights and Shadows. The eye sees the difference in brightness more evenly anyway, so why not make the picture also that way.
Often, if the focus is on the bright part of the image, the shadows will be too dark. Or if the focus is on the shadows, then the bright areas will be overexposed. Sometimes both sides are in trouble, as is the case in the picture below. In Photoshop, it's easy to brighten only the shadows and lower the brightness of the bright areas.
The lower picture:
- Highlights -50
- Shadows +50
- Dehaze +20
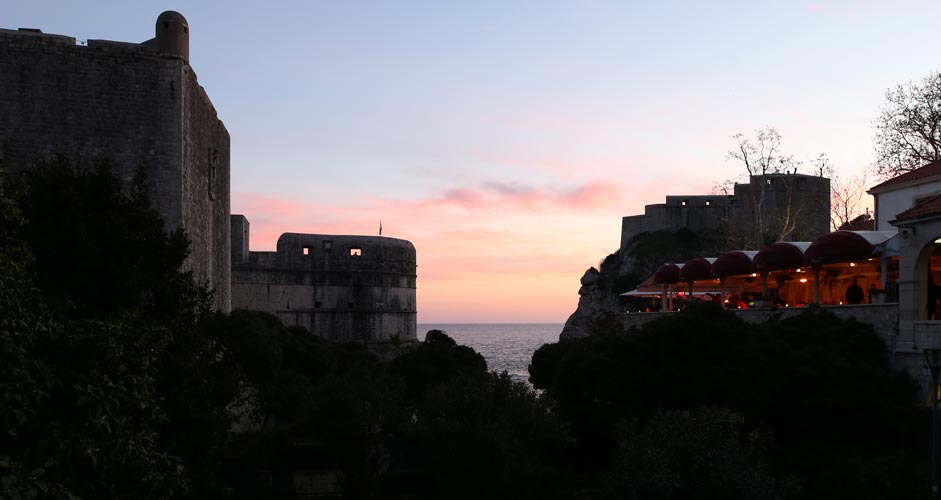
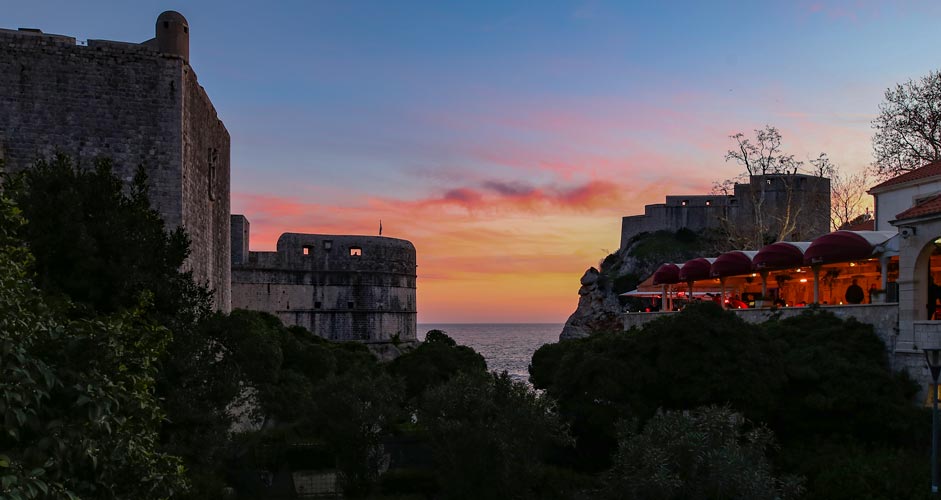
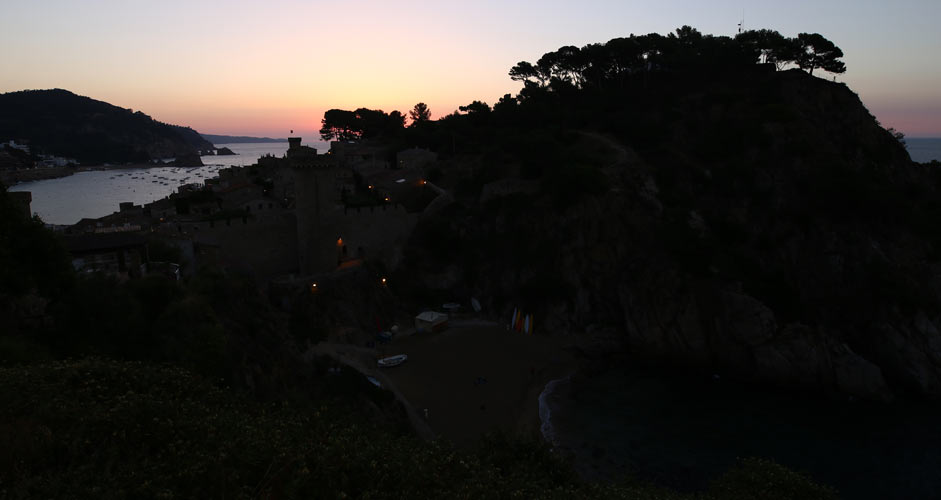
The same goes for images taken at dusk. A heavier hand has been used in the image below. Colors are easily exaggerated if Highlights are lowered and Dehaze is used, but that problem can be fixed in the next section.
The lower picture:
- Highlights -70
- Shadows +60
- Dehaze +40
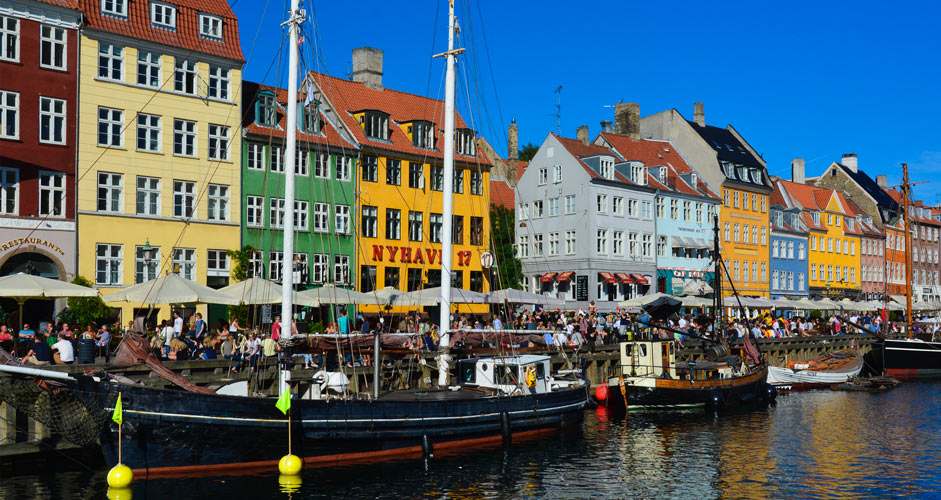
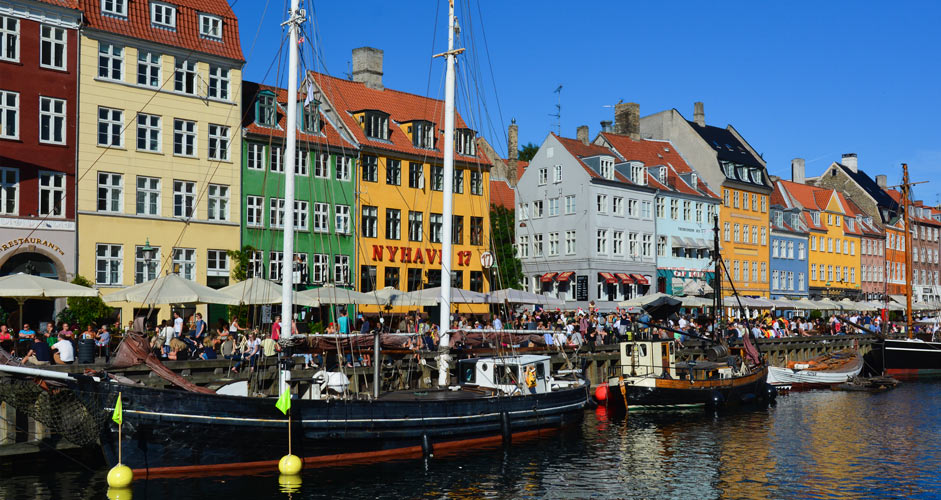
Colors
The above-mentioned Dehaze also enhances colors, but the actual color saturation enhancers are Saturation and Vibrance in the Camera Raw Filter (also found in Image/Adjustments). It's easy to test different options with them to get the colors correct.
Sometimes a certain color may be overemphasized while others are in balance. Especially when using Dehaze, yellow is easily highlighted, and some phone cameras may emphasize the blue of the sky to the point of being too excessive, making it a good idea to reduce it. At the same time, however, you do not want it to apply to other colors.
The Camera Raw Filter includes a Color Mixer that allows you to change the Hue, Saturation, or Luminance of individual colors.
In the image below, blue and yellow are a bit too saturated, so they have been changed in the Color Mixer without touching the other colors.
The lower picture:
- Blues: Saturation -15
- Blues: Luminance +5
- Yellows: Saturation -25
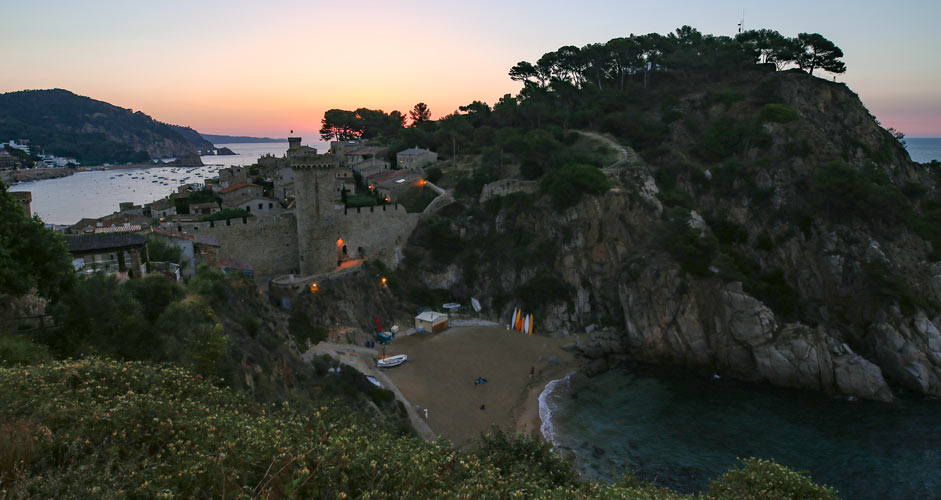
In the next sunrise picture, the sky is not as overexposed as in the previous sunset picture, but the foreground is even darker, so you'll also need to increase the brightness of the whole picture (Exposure). To even it out, a decrease of Highlights is also needed in the sky.
After this and dehaze, to reduce yellowness, the hue of yellows will need adjustment towards orange, and the brightness of yellow alone needs to be raised. In this way, the yellowness is not too exaggerated, and the otherwise good-looking sky may be as it is when only the foreground is more illuminated.
The lower picture:
- Shadows +80
- Highlights -45
- Exposure +1.00
- Dehaze +30
- Yellows: Hue -50
- Yellows: Luminance +20
Sharpening
The Camera Raw Filter has two easy methods for sharpening: Texture and Clarity. Especially Texture is a very quick and effective tool for sharpening .
The actual sharpening tool is Filter -> Sharpen -> Unsharp Mask in the top menu. You might want to keep the Preview checked, so you will immediately see what the changes will look like.
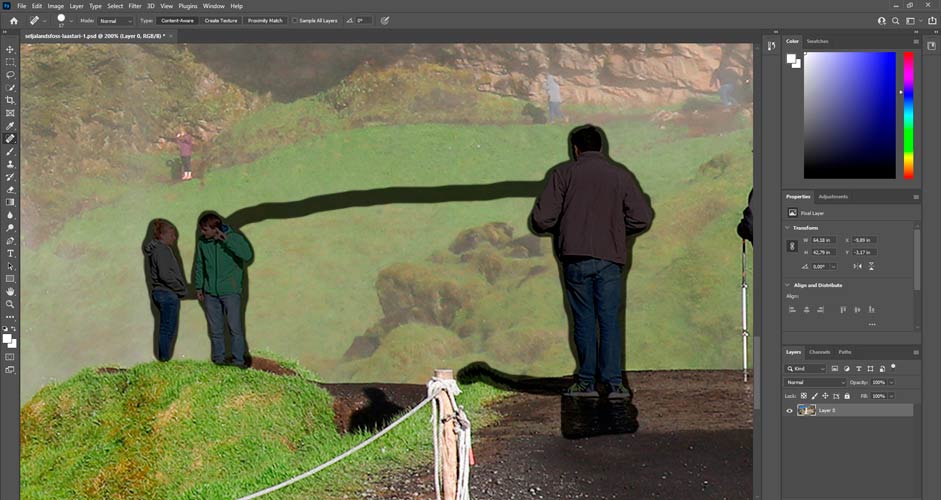
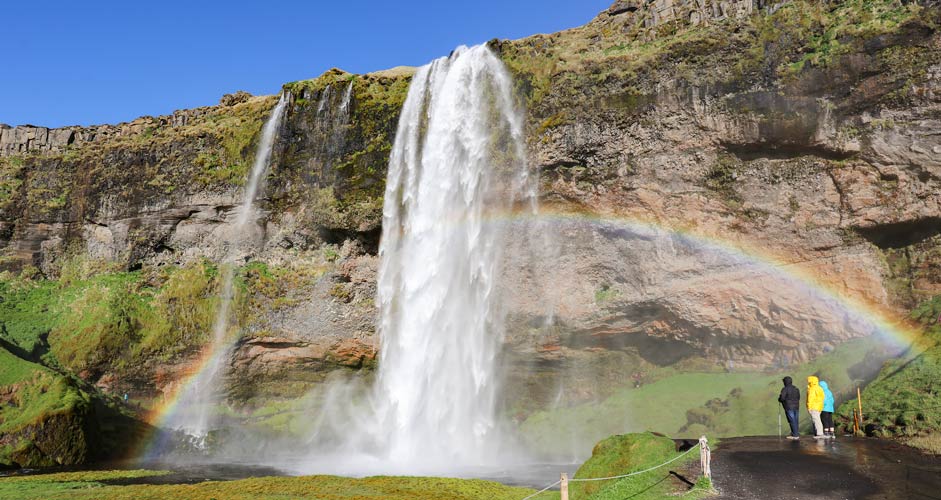
Removing objects from the picture – Spot Healing Brush
The Spot Healing Brush is a good tool if the picture has spots in the sky from a dirty lens, a trash can in the wrong place, or a person looking directly at the camera. To do this, right-click on the band-aid image on the left-hand side and make sure the option on the top is selected (Spot Healing Brush). You can resize the brush by holding down the Alt key and the right mouse button, and by moving the mouse at the same time.
The tool mimics the environment of the thing to be deleted, and therefore its background is essential here. If the background is flat, simply painting the thing to be removed with the Spot Healing Brush is often enough, regardless of whether it is sky, a wall of a building, a lawn, sand or sea. Or even a combination of all of the above.
If there is something more difficult to copy in the background, then you need a Clone Stamp tool (the paint brush on the left). It enables you to copy things freely from anywhere you want in the picture even pixel by pixel. Just first adjust the copy stamp to the correct size, take a copy of the desired spot with the left mouse button while holding down the Alt key, and then paint that exact object at the desired location while holding down the left mouse button.
With the Spot Healing Brush, it's good to paint the thing to be removed a little over the edges, so the end result will be better. In the images below, three people have been removed with a single stroke. The result is not perfect with this background, but with the same tool you can continue to improve it endlessly. And if necessary, you can use the Clone Stamp tool as well.

Noise reduction
If you take pictures at dusk or in the dark and use high ISO, the picture will easily become noisy, that is, it will be full of very small light dots. They can be removed at the top menu: Filter -> Noise -> Reduce Noise.
From the Reduce Noise menu you can control the deletion intensity and how much of the details are preserved. Of course, the more you want to preserve the details, the lesser the noise reduction will be. Good basic settings are Strength: 10 and Preserve details: 34 (and zeros for Color Noise and Sharpen Details). This eliminates some noise, but the details remain sharp.
How to make a watermark in Photoshop
These instructions are for making a text-only watermark. The text must be first written on a transparent background, after which it will be made into a brush. The size and color of the brush can easily be changed in the future, so only the text and font are important for now. But if you make a brush that is too small at the beginning, it may appear blurry in the future. So, it's easier to make a large brush smaller than the other way around.
- Start by making a new blank template: File -> New and select Background Contents = Transparent, so the template is colorless and invisible (shown in gray and white boxes) -> Create.
- Select the big T from the menu on the left (the writing mode).
- Crop the entire screen area as a selection.
- Some sample writing appears on the screen, delete it.
- Select the font, style and font size from the top (you should choose the largest possible font size that will fit on the screen).
- Write the watermark text.
- Press the check mark.
- To turn the text into a watermark, choose Edit -> Define Brush Preset from the top menu and give the brush a name.
The watermark is now saved as a brush and will be found in Photoshop when it is opened.
To use the watermark:
- Make a new layer in the image by clicking the plus sign in the lower right corner (next to the trash can). The new transparent layer is automatically selected for editing.
- Select the image of the brush on the left (just below the band-aid).
- If the watermark is not pre-selected from previous edits, search for the right brush in the top menu options (below the text line, third option on the left).
- To adjust the watermark to the correct size, hold down the Alt key and the right mouse button at the same time and move the mouse.
- Move the watermark in the right place and click the left mouse button. It will now be in place.
- In the future, the watermark can be moved and resized easily by clicking on that particular layer to make it active and selecting Edit -> Free Transform from the top menu.
- If you want the watermark to be dimmer and more transparent, you can adjust the transparency of the layer from the Opacity above it.
- As you continue editing the image, remember to select the correct layer as active again if the watermark layer is active.
Image resizing before saving
If the image is large in terms of pixels and you want to save only a small image for a web page, it can easily become blurry if you save it directly from the big image. It's a good idea to resize the image first (Image -> Image Size and select pixels as the unit).
Below, there are two images saved from the same 5000*3333-pixel image with a target size of only 300*200 px. The upper image was saved directly from the large image without any resizing. The lower image was first resized to a 300*200 image and then saved.

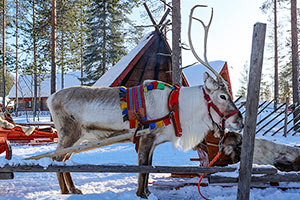
The difference in image sharpness is considerable, and there is a clear difference even in their kilobytes: 34.5 vs. 29.6 kb, even though it is exactly the same image.
It's best to reduce the number of pixels by halving the number of pixels of the longer side until you reach the target number. And the halving should start from as far as possible. That is, from 5000 pixels of the sample image, 300 pixels was obtained with five reductions: 5000 -> 4800 -> 2400 -> 1200 -> 600 -> 300.
If the resizing was made from 5000 to 300 at one time, then the result was a bit more hazy and the size was only 32.6 vs. 34.5 kilobytes, which already indicates lower image quality.
How the image quality makes a difference in resizing
If the image is even a bit out of focus or otherwise of not very high quality, then reducing it from 5000 px to 300 px, for example, will make the image look over-sharpened, and it will not be pleasing to the eye. In this case, you should leave the resizing of the image to double or even triple size (600 or 1200 pixels wide in this case), if you are going to save it as 300 pixels wide. Then, it will be a bit softer and won't look so over-sharpened.
From the image preview (in Export --> Save for Web) you can test what the image looks like and which option is sharp enough but not too sharp.
Saving the picture for a website/blog or social media
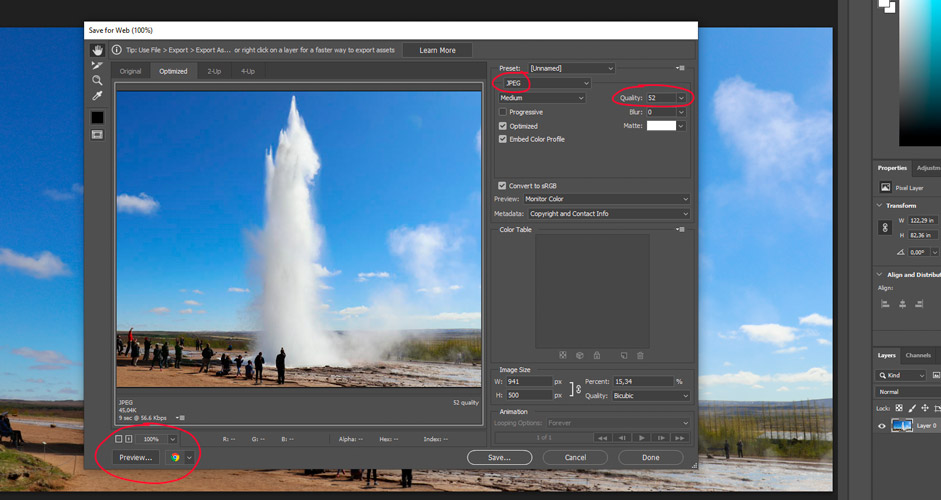
When the image is complete, it can be saved from the top menu --> File -> Export -> Save for Web. It's a good idea to adjust the image size first (see the section above). For other settings for the internet, you may want to select JPEG as the image type and Bicubic for the Quality.
Before saving, it's important to adjust the image quality (one of the circled figures). The effect on the kilobytes is easily significant. If you put an image on a blog, the smaller the image is in kilobytes, the faster the blog will load, so it's important to pay attention to that. In the example image (941*500 pixels) with the 100% quality the size is 232 kilobytes. With the 60% quality, it's only 51 kilobytes. And there is practically no difference in the pictures.
A clear blue sky is the first one to suffer from the reduced quality, and it usually shows at about 50% quality So, more than 60% quality should only be used in exceptional cases, because there is usually no need for such high quality. If there is no sky in the picture, but for example, buildings, even 30% quality can be quite sufficient.
It's good to use the preview option (lower left corner) and select the browser that you usually use. In the preview, you can see how it will ultimately look like on your blog or website.
The Photoshop file itself can be stored on your computer with File -> Save As (choose Photoshop as the format). All the edits made will still be there when the .psd file is opened the next time.
General tips
Shortcuts – There are shortcuts for many functions for using them faster. For example, the Undo is Ctrl + z, which is familiar from other programs. The reverse for it is Ctrl + Shift + z. They are very handy when comparing the before-and-after. The shortcut keys are marked after the function name when you select it from the top menu. You can also build your own shortcuts in Edit -> Keyboard Shortcuts.
Layers – It's possible to make copies of the image, i.e. different layers by dragging the current layer to the plus sign at the bottom right corner or pressing Ctrl + J. Then the selected layer will duplicate. Different changes can be made to different layers, each one shown in the picture, but a single layer can also be "turned off" by clicking on the eye image on the left of the layer. In this way, you can make edits more freely and they can be canceled or edited more easily. At the same time, it also allows you to see the effect of individual edits by clicking the layer on/off. Unnecessary layers can be dragged to the trash can at the bottom right corner. Different layers can be combined by holding down the Shift key, selecting the desired layers with the left mouse button, and selecting Merge Layers with the right mouse button. Then they can again be edited all at once.
More tutorials – If you are looking for tutorial videos on YouTube, Phlearn is a very good option. The teaching style is, however, quite fast, and not every little thing is always explained. Instead, it's assumed that the viewer already has some basic skills, so for a beginner it's sometimes difficult to keep up. But in the long run, it's a good thing that different topics at hand are taught quickly without unnecessary slowdowns.
Photo locations and their travel guides
Image ratio and Crop tool: Porto
Straightening the image: Reynisdrangar, South Iceland
Lens correction: Old Town Square, Prague
Deepen the colors with Dehaze: Sveti Nikola island, Budva
Photo temperature: Golden Bay Beach, Beaches in Malta
Shadows and highlights: Lapad peninsula + Old Town walls and Fort Lovrijenac, Dubrovnik
Colors: Nyhavn, Copenhagen, the sunrise picture: Tossa de Mar
Removing objects: Seljalandsfoss, South Iceland
Image resizing: Santa Claus Reindeer, Rovaniemi
Saving the picture: Strokkur, Golden Circle, Iceland
---
Text and images: Jussi Ryynänen